How to Optimize Video for the Web
/* A little background: This is pretty old at this point! I wrote this in 2017 after a lot of frustration and a lot of research, trial and error. It may be slightly dated but I still find this useful for my own purposes, and I thought someone else out there might find it useful too. If there’s an even better way to handle video at this point, let me know! – Joe */
So you need to put video on your website? As of this writing (February 2017) there are two video formats that you should be using to maximize browser support: .MP4 and .WebM. I will be talking about how to export/convert your video for both. Hopefully there will be a single standard soon, as WebM is being developed by Google and is open source, meaning anyone can pick it up for free. They sure are taking their sweet time though.
Video without a lot of fast motion works best for this! Subtle camera pans, a few things moving in the background with something not moving much in focus are your best bets for high quality and low file size videos. You might typically find these kinds of videos as a hero section on a homepage.
In the examples below, I am working with an unoptimized, regular .MOV file, and converting that to the desired filetype.
.MP4
The easiest way I have found to optimize video for use as a big hero-screen video is to download the application ‘Handbrake’.
- Click ‘Source’ to choose what video file you want to optimize. This can be any video I think. We will be optimizing the original file here. Always optimize the original video file to get the best quality possible.
- We want a .MP4 file encoded in H.264 (Video Codec) ultimately. This is very well supported across the web by all modern web browsers.
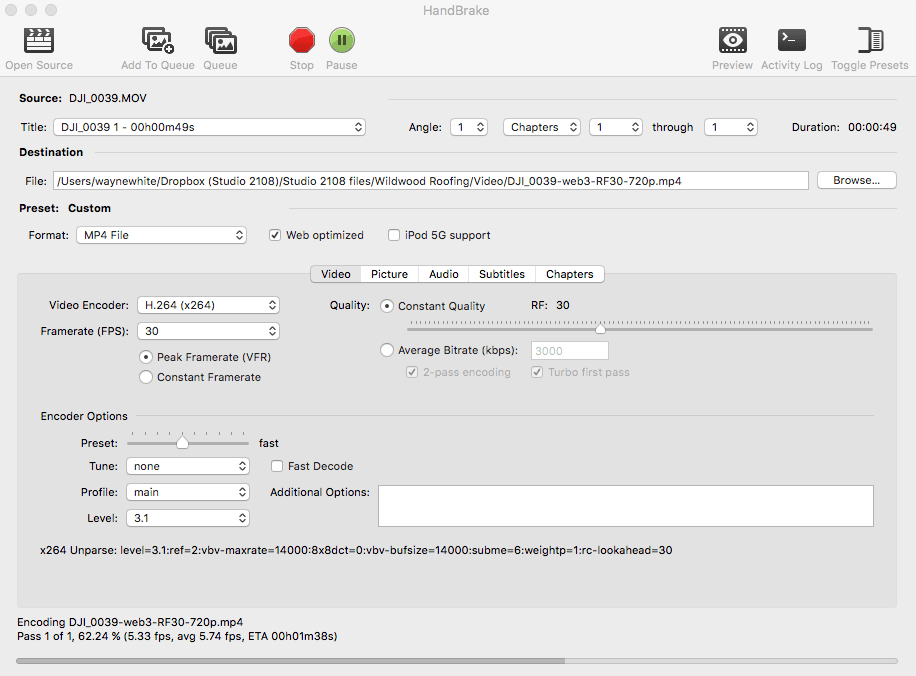
- In Handbrake, we will choose the following settings:
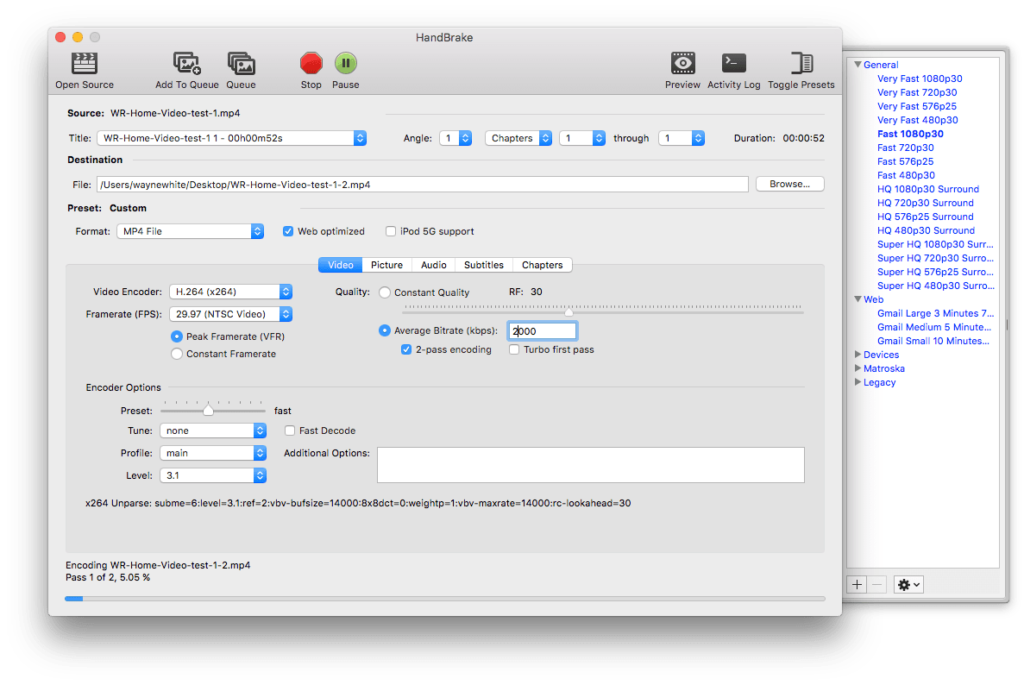
- Click ‘Toggle Presets’ and select ‘Fast 720p30’ (This translates to a resolution of 720p, and a framerate of 30fps)
- Check the box that says ‘Web optimized’ (This will ensure that the <moov> atom is first in the file, ensuring speedy download/play by the browser.
- I cannot stress enough how important this little thing is.
- For quality, choose ‘Constant Quality’ and make the value RF 30. (Note: If you need the quality improved, try 25 or 20 RF)
- Framerate should be around 30 as a maximum. It’s important that it matches the original framerate of the video you are converting/encoding.
- Hit Play and watch it go!
Also of note!
If you don’t need audio, click on the ‘Audio’ tab and remove all tracks.- Trim the duration of the video down to exactly what you want. Any excess time will increase the file size.

ALTERNATIVE SETTINGS if Constant Quality is giving you poor results:

.WebM
Adobe still does not support the WebM format natively (as of 2017) even though everyone now pays them every month to keep things up to date. In order to make this format work best for the web, there’s a couple of things we need to do:
- Please download & install this WebM plugin for Adobe Premier Pro: http://www.fnordware.com/WebM/
- Open Adobe Premier Pro (I’m using CC 2017)
Downloadmkclean(mac version): (IGNORE!)https://sourceforge.net/projects/matroska/files/mkclean/ (this is a command line tool.)- Import the original, unoptimized video file you want to use into Premier.
- Export the video (⌘M)
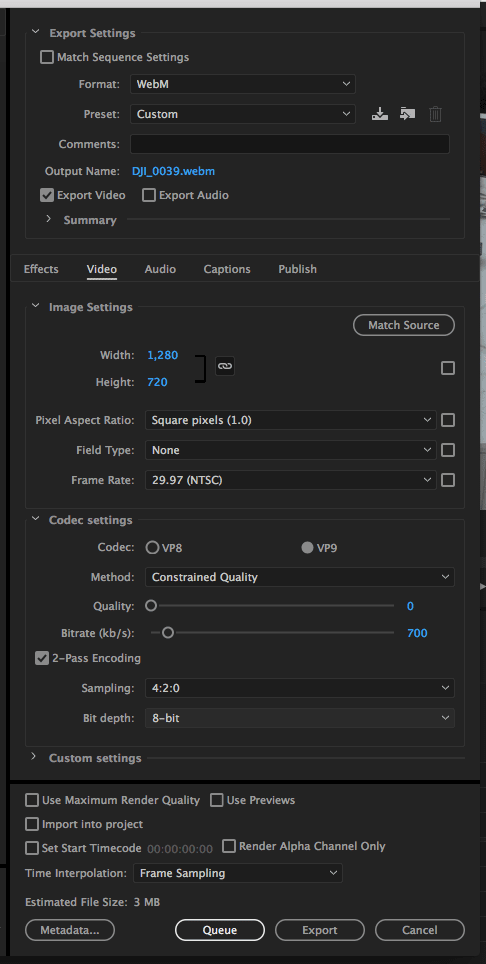
- Use the following export settings!
- Select WebM as the format
- Uncheck Export Audio if you do not need sound. Recommended.
- Under the video tab (ignore the others),
- Size should be 720p for fullscreen video (1280px wide by 720px tall)
- Square Pixels, No field type, Frame Rate (this should probably match your original video, with a maximum being 30fps)
- Codec: VP9
- Method: Constrained Quality
- Quality: 0
- Bitrate: 700 (This number is flexible. Higher number means better quality but larger file size, and vice versa)
- 2-Pass Encoding, 4:2:0 sampling, 8-bit depth
- Click export, pull out the popcorn and wait!

That’s all folks! Happy encoding.
Tutorial on how to create a Full-Screen Video Background with HTML5 Video: (if it’s not part of the WordPress theme) https://envato.com/blog/video-background-html5-video/
Example code that plays .mp4 video first, then .webm, then defaults to image placeholder:
<video id="my-video" class="video" autoplay="autoplay" loop="loop" muted="muted" width="100%" height=""> <source src="<?php echo bloginfo('template_url'); ?>/assets/videofile.mp4" type="video/mp4" /> <source src="<?php echo bloginfo('template_url'); ?>/assets/videofile.webm" type="video/webm" /> <img src="<?php echo bloginfo('template_url'); ?>/assets/images/videofile-placeholder.jpg" class="video-placeholder"/></video>